Master cylinder brake adjustment is a critical maintenance task that ensures your vehicle’s braking system operates efficiently and safely. This process involves fine-tuning the relationship between the brake pedal, master cylinder, and brake lines to optimize braking performance. Proper adjustment not only enhances safety but also extends the life of your braking components.
The master cylinder is the heart of your vehicle’s hydraulic brake system. It converts the mechanical force from your foot pressing the brake pedal into hydraulic pressure that activates the brakes at each wheel. Over time, wear and tear can affect the master cylinder’s performance, necessitating adjustment to maintain optimal braking efficiency.
Adjusting your master cylinder involves several key steps, including checking the brake fluid level, inspecting the pushrod length, and ensuring proper pedal free play. These adjustments can significantly impact your vehicle’s stopping power and pedal feel.
| Component | Function |
|---|---|
| Master Cylinder | Converts mechanical force to hydraulic pressure |
| Brake Pedal | Applies force to the master cylinder |
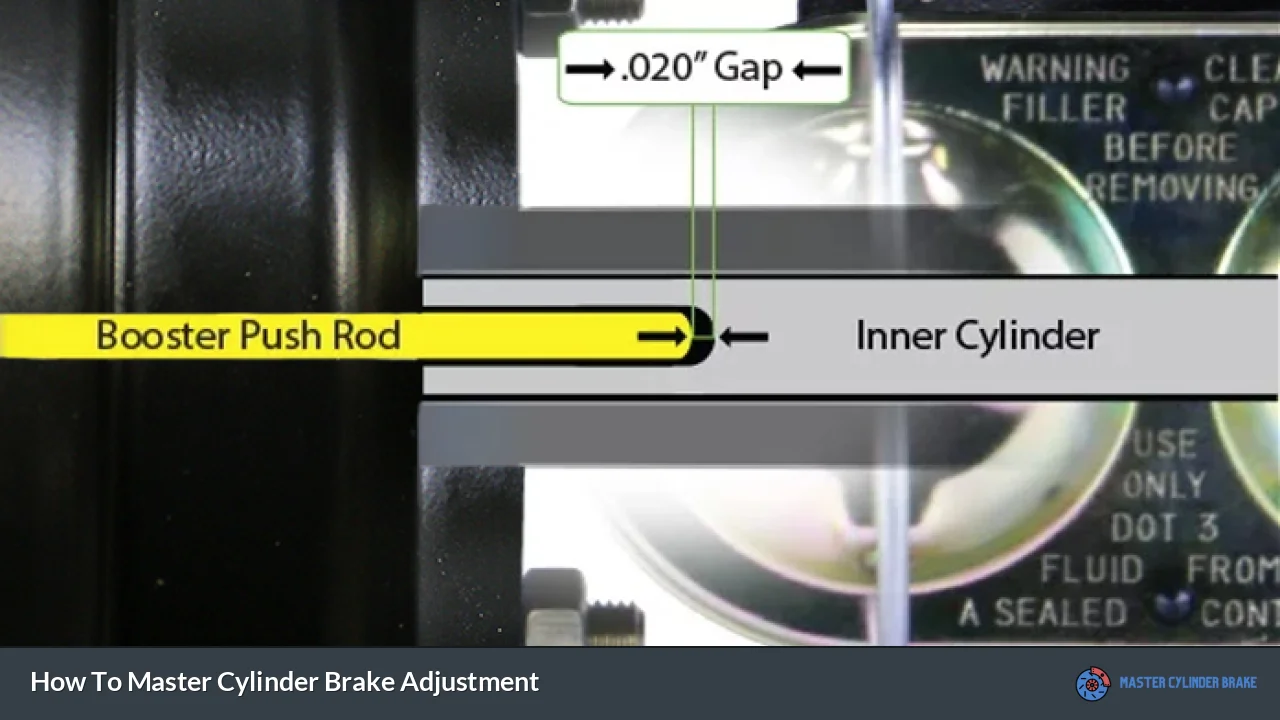
| Pushrod | Connects brake pedal to master cylinder piston |
| Brake Lines | Transmit hydraulic pressure to wheel cylinders or calipers |
Understanding Master Cylinder Components
To effectively adjust your master cylinder, it’s crucial to understand its key components and their functions. The master cylinder consists of a reservoir for brake fluid, pistons, and various seals and valves. The brake pedal is connected to the master cylinder via a pushrod, which transfers the force from your foot to the master cylinder pistons.
The pistons inside the master cylinder create hydraulic pressure when activated by the pushrod. This pressure is then transmitted through brake lines to the wheel cylinders or calipers, causing the brake pads or shoes to engage with the rotors or drums, respectively. The entire system relies on proper adjustment to function correctly.
One critical aspect of master cylinder adjustment is the pushrod length. If the pushrod is too long, it can cause the brakes to drag, leading to premature wear and reduced fuel efficiency. Conversely, if it’s too short, there may be excessive pedal travel before the brakes engage, compromising safety.
Another important factor is the brake pedal free play. This is the distance the pedal moves before it starts to engage the master cylinder piston. Proper free play ensures that the brakes aren’t partially engaged when your foot is off the pedal, preventing unnecessary wear and heat buildup.
Steps for Master Cylinder Brake Adjustment
Adjusting your master cylinder requires attention to detail and a systematic approach. Follow these steps to ensure a proper adjustment:
1. Safety First: Always work on a level surface with the engine off and the parking brake engaged. Use wheel chocks for added safety.
2. Check Brake Fluid Level: Begin by inspecting the brake fluid level in the master cylinder reservoir. It should be between the “MIN” and “MAX” lines. If low, top it off with the appropriate brake fluid for your vehicle.
3. Inspect Brake Lines: Examine all brake lines for signs of wear, leaks, or damage. Replace any compromised lines before proceeding with the adjustment.
4. Measure Pedal Free Play: With the engine off, press the brake pedal slowly until you feel resistance. This distance should typically be between 1/4 to 1/2 inch, but consult your vehicle’s manual for specific recommendations.
5. Adjust Pushrod Length: If the free play is incorrect, you’ll need to adjust the pushrod length. This usually involves turning an adjustment nut on the pushrod. Clockwise rotation typically shortens the pushrod, while counterclockwise lengthens it.
6. Check Pedal Height: The brake pedal should be at the correct height relative to the accelerator pedal. Adjust if necessary using the pedal stop or pushrod.
7. Bleed the Brakes: After making adjustments, bleed the brake system to remove any air that may have entered during the process. This ensures proper hydraulic pressure throughout the system.
8. Test the Brakes: With the engine running, press the brake pedal firmly several times to build up pressure. The pedal should feel firm and not sink to the floor.
9. Road Test: Finally, perform a road test in a safe area to ensure the brakes are functioning correctly. Pay attention to pedal feel, stopping distance, and any unusual noises or vibrations.
Common Issues and Troubleshooting
Even with proper adjustment, you may encounter some issues with your master cylinder or braking system. Here are some common problems and their potential solutions:
- Spongy Brake Pedal: This could indicate air in the brake lines. Bleed the brakes thoroughly to remove any air bubbles.
- Brake Pedal Sinks to Floor: This may be a sign of a failing master cylinder or a leak in the system. Inspect for leaks and consider replacing the master cylinder if necessary.
- Uneven Braking: If the vehicle pulls to one side when braking, there may be a problem with a caliper or wheel cylinder. Inspect and replace as needed.
- Brake Drag: If the brakes seem to drag even when the pedal is released, the pushrod may be too long or there could be a problem with a caliper or wheel cylinder.
- Excessive Pedal Travel: This could indicate worn brake pads or shoes, or it may mean the pushrod needs adjustment.
Remember, if you’re unsure about any aspect of master cylinder adjustment or encounter persistent issues, it’s best to consult a professional mechanic. Brakes are a critical safety system, and proper function is essential.
Maintenance Tips for Optimal Performance
To keep your master cylinder and braking system in top condition, follow these maintenance tips:
- Regular Inspections: Check your brake fluid level and condition monthly. Look for any signs of leaks or damage to brake lines.
- Flush Brake Fluid: Brake fluid absorbs moisture over time, which can lead to corrosion and reduced performance. Flush and replace the fluid according to your vehicle manufacturer’s recommendations, typically every 2-3 years.
- Replace Worn Components: Don’t wait for brake failure. Replace brake pads, shoes, and other components when they show signs of significant wear.
- Address Issues Promptly: If you notice any changes in brake performance, such as unusual noises, vibrations, or reduced stopping power, have your system inspected immediately.
- Use Quality Parts: When replacing components, use high-quality parts that meet or exceed your vehicle manufacturer’s specifications.
By following these guidelines and performing regular maintenance, you can ensure your master cylinder and braking system remain in optimal condition, providing reliable and safe performance for years to come.
FAQs About How To Master Cylinder Brake Adjustment
- How often should I adjust my master cylinder?
Typically, master cylinders don’t require frequent adjustments. Check your vehicle’s manual for specific recommendations, but generally, inspect annually or if you notice changes in brake performance. - Can I adjust the master cylinder myself?
While possible for experienced DIYers, it’s often best to have a professional mechanic perform this adjustment due to its critical nature and the potential safety implications. - What tools do I need for master cylinder adjustment?
Common tools include wrenches, pliers, a brake bleeding kit, and potentially a specialized brake adjustment tool. Always consult your vehicle’s manual for specific requirements. - How do I know if my master cylinder needs adjustment?
Signs include a spongy brake pedal, excessive pedal travel before brakes engage, or uneven braking performance. If you notice these issues, have your braking system inspected. - What happens if the master cylinder is not adjusted correctly?
Improper adjustment can lead to reduced braking efficiency, increased stopping distances, premature wear of brake components, and potentially dangerous brake failure in extreme cases.