A master cylinder brake job is a critical maintenance task that ensures your vehicle’s braking system functions properly. This procedure involves inspecting, repairing, or replacing the master cylinder, which is the heart of your car’s hydraulic brake system. The master cylinder converts the force applied to the brake pedal into hydraulic pressure, which then activates the brakes at each wheel. Performing this job correctly is essential for maintaining optimal braking performance and ensuring your safety on the road.
Before diving into the specifics of a master cylinder brake job, it’s important to understand the key components involved and the signs that indicate your master cylinder may need attention. A failing master cylinder can lead to reduced braking power, increased stopping distances, and in severe cases, complete brake failure. By recognizing the symptoms early and addressing them promptly, you can avoid potentially dangerous situations and costly repairs down the line.
| Common Symptoms | Possible Causes |
|---|---|
| Spongy brake pedal | Air in brake lines or failing master cylinder |
| Brake warning light on | Low brake fluid or system malfunction |
| Fluid leaks | Damaged seals or corrosion |
| Uneven braking | Internal master cylinder failure |
Preparing for a Master Cylinder Brake Job
Before beginning a master cylinder brake job, it’s crucial to gather all necessary tools and materials. This preparation will ensure a smooth and efficient process, minimizing the time your vehicle is out of commission. Safety should be your top priority throughout this procedure, as you’ll be working with hydraulic systems and potentially hazardous brake fluid.
Start by acquiring a new master cylinder that matches your vehicle’s specifications. It’s generally recommended to replace the entire unit rather than attempting to rebuild an old one, as this ensures optimal performance and reliability. You’ll also need fresh brake fluid that meets your vehicle manufacturer’s requirements, typically DOT 3 or DOT 4. Other essential tools include:
- Jack and jack stands
- Wrench set and socket set
- Brake line wrenches
- Brake bleeding kit
- Clean rags and brake cleaner
- Catch pan for old brake fluid
Before you begin work, ensure your vehicle is parked on a level surface and the engine is cool. Engage the parking brake and chock the wheels to prevent any movement. Disconnect the negative battery terminal to avoid any electrical issues while working on the brake system.
It’s also wise to consult your vehicle’s service manual for specific instructions and torque specifications. Each make and model may have slight variations in the master cylinder replacement process, and following manufacturer guidelines will help prevent mistakes and ensure a proper installation.
Removing the Old Master Cylinder
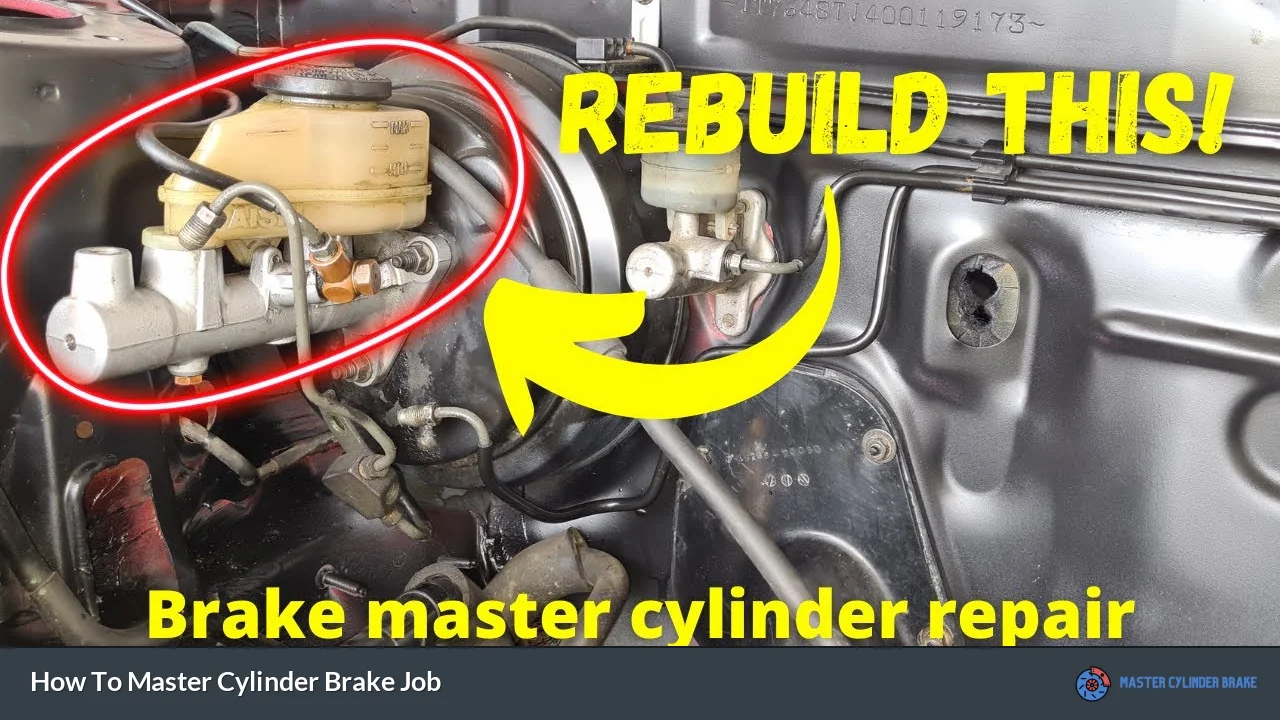
The first step in the master cylinder brake job is removing the old unit. This process requires careful attention to detail to avoid damaging other components or spilling brake fluid. Begin by locating the master cylinder, which is typically mounted on the firewall in the engine compartment, directly in front of the driver’s seat.
Start by removing the brake fluid reservoir cap and using a turkey baster or syringe to remove as much brake fluid as possible from the reservoir. This will minimize spillage during the removal process. Be cautious, as brake fluid can damage paint if it comes into contact with your vehicle’s exterior.
Next, identify and disconnect the brake lines connected to the master cylinder. Use the appropriate size brake line wrench to avoid rounding off the fittings. It’s a good idea to label these lines if there are multiple connections to ensure proper reassembly later. Place a catch pan underneath to collect any remaining fluid that may drip out.
With the brake lines disconnected, you can now remove the mounting bolts that secure the master cylinder to the brake booster or firewall. These are typically accessible from inside the engine compartment. Once the bolts are removed, carefully pull the master cylinder away from the mounting surface. Be prepared for some resistance, as there may be a seal between the master cylinder and the brake booster.
Inspect the area around where the master cylinder was mounted. Look for any signs of leakage, corrosion, or damage to the brake booster. This is an opportune time to clean the mounting surface and check the condition of the brake booster, as problems here could affect the performance of your new master cylinder.
Installing the New Master Cylinder
With the old master cylinder removed, you’re ready to install the new unit. Before installation, it’s crucial to bench bleed the new master cylinder to remove any air from the system. This process involves filling the reservoir with brake fluid and using a special bleeding kit or makeshift setup to cycle fluid through the cylinder’s ports.
To bench bleed, secure the master cylinder in a vise or have a helper hold it steady. Fill the reservoir with new brake fluid and attach bleeding tubes to the outlet ports, routing them back into the reservoir. Use a blunt tool to slowly depress the piston, watching for air bubbles in the fluid. Continue this process until no more air bubbles are visible and the piston movement feels firm.
Once bench bleeding is complete, you can proceed with installation. First, check that the new master cylinder matches the old one in terms of mounting points and port configuration. Apply a thin layer of brake fluid to the rubber seal on the back of the master cylinder to help it seat properly against the brake booster.
Carefully position the new master cylinder against the mounting surface, ensuring it’s properly aligned. Insert and hand-tighten the mounting bolts to hold it in place. Use a torque wrench to tighten the bolts to the manufacturer’s specified torque, typically in a cross pattern to ensure even seating.
Reconnect the brake lines to the new master cylinder, being careful not to cross-thread the fittings. Tighten them securely with a brake line wrench, but avoid over-tightening, which can damage the threads or fittings. Double-check all connections to ensure they’re properly seated and tight.
Bleeding the Brake System
After installing the new master cylinder, it’s essential to bleed the entire brake system to remove any air that may have entered during the replacement process. Air in the brake lines can cause a spongy pedal feel and reduced braking performance. The bleeding process involves pushing brake fluid through the system to force out any air bubbles.
Start by refilling the master cylinder reservoir with fresh brake fluid. It’s important to keep an eye on the fluid level throughout the bleeding process and top it off as needed to prevent air from being drawn back into the system.
There are several methods for bleeding brakes, including the traditional two-person method, gravity bleeding, and pressure bleeding. The two-person method is most common for DIY mechanics:
- Have a helper sit in the driver’s seat to pump the brake pedal
- Start with the brake furthest from the master cylinder, usually the right rear
- Open the bleeder screw while your helper holds the pedal down
- Close the bleeder screw before your helper releases the pedal
- Repeat this process until clear fluid flows without air bubbles
- Move to the next wheel in order: left rear, right front, left front
Throughout this process, keep the master cylinder reservoir filled with brake fluid. If it runs dry, you’ll introduce air into the system and have to start over. Once all four brakes have been bled, check the pedal feel. It should be firm and responsive. If it still feels soft or spongy, repeat the bleeding process.
Final Checks and Road Test
After completing the master cylinder replacement and brake bleeding, it’s time for final checks before taking your vehicle for a road test. Start by rechecking all connections, ensuring there are no leaks around the master cylinder or brake lines. Top off the brake fluid reservoir to the proper level and replace the cap securely.
Reconnect the negative battery terminal and start the engine. With the engine running, press the brake pedal firmly several times to build up vacuum in the brake booster. The pedal should feel firm and consistent. If it’s still soft or sinks to the floor, there may be air remaining in the system or an issue with the installation.
Before driving, pump the brakes a few times with the engine off to ensure the pedal builds pressure. Then, with the engine running, apply steady pressure to the brake pedal for about 10 seconds. If the pedal sinks or feels spongy, there may be a leak in the system that needs to be addressed.
When you’re confident in the installation, take your vehicle for a careful test drive in a safe area with little traffic. Start with low-speed stops to get a feel for the brakes. Gradually increase your speed and braking force, paying attention to any unusual noises, vibrations, or pulling to one side. The brakes should feel responsive and bring the vehicle to a smooth, controlled stop.
After the test drive, recheck for any fluid leaks and inspect the brake fluid level once more. If everything checks out, your master cylinder brake job is complete. Remember to properly dispose of any old brake fluid and components according to local regulations, as brake fluid is considered hazardous waste.
FAQs About How To Master Cylinder Brake Job
- How often should a master cylinder be replaced?
Master cylinders typically last 60,000 to 100,000 miles, but can fail sooner due to contamination or wear. - Can I drive with a failing master cylinder?
It’s not safe to drive with a failing master cylinder as it can lead to complete brake failure. - How long does a master cylinder brake job take?
A professional can complete the job in 2-3 hours, while a DIY job may take 4-6 hours. - What causes a master cylinder to fail?
Common causes include seal deterioration, contaminated brake fluid, and normal wear and tear. - How much does a master cylinder replacement cost?
Costs range from $200 to $500 for parts and labor, depending on the vehicle make and model.