The master cylinder is a crucial component of a vehicle’s braking system, responsible for converting mechanical force from the brake pedal into hydraulic pressure. Testing the master cylinder is essential for ensuring your vehicle’s braking system functions properly and safely. This article will guide you through the process of testing your master cylinder brake, helping you identify potential issues and maintain optimal braking performance.
A properly functioning master cylinder is vital for safe vehicle operation. Regular testing can help prevent brake failure and costly repairs. Here’s a quick overview of the master cylinder’s importance:
| Aspect | Importance |
|---|---|
| Safety | Ensures reliable braking performance |
| Maintenance | Prevents costly repairs and breakdowns |
| Performance | Maintains optimal braking efficiency |
| Longevity | Extends the life of the braking system |
Visual Inspection
Before diving into more complex tests, start with a thorough visual inspection of the master cylinder and surrounding components. This step can often reveal obvious issues that may be affecting your braking system’s performance.
Begin by locating the master cylinder under the hood of your vehicle. It’s typically situated near the firewall on the driver’s side, connected to the brake fluid reservoir. Look for any signs of brake fluid leaks, which may appear as wet spots or stains on the cylinder itself or the surrounding areas.
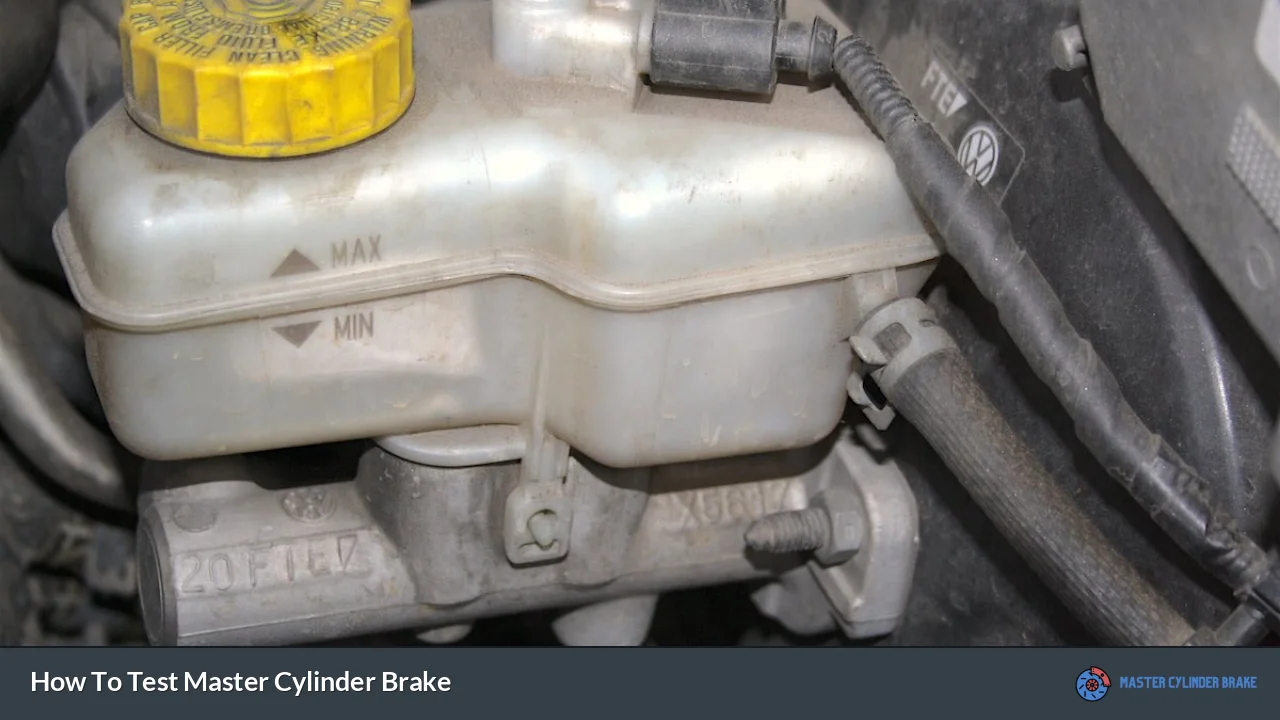
Inspect the brake fluid reservoir for proper fluid levels. Most reservoirs have “MIN” and “MAX” markings on the side. The fluid level should be between these two marks. If the level is below the “MIN” line, it could indicate a leak in the system or worn brake pads.
Check the color and consistency of the brake fluid. Clean brake fluid should be clear with a slight yellow tint. If the fluid appears dark brown or black, it may be contaminated and require replacement. Similarly, if you notice any debris or particles in the fluid, this could indicate internal wear of the master cylinder or other brake components.
Examine the rubber seals and boots around the master cylinder for signs of deterioration, cracking, or damage. These components prevent contaminants from entering the system and maintain proper pressure. Any visible damage to these parts may require replacement of the master cylinder.
Lastly, inspect all brake lines and connections leading from the master cylinder for signs of corrosion, damage, or leaks. Pay close attention to the areas where the brake lines connect to the master cylinder, as these are common points for leaks to develop.
Brake Pedal Test
The brake pedal test is a simple yet effective way to assess the condition of your master cylinder. This test helps identify internal leaks or seal failures within the cylinder.
To perform the brake pedal test, follow these steps:
1. Start your vehicle and let it idle.
2. Apply firm, steady pressure to the brake pedal.
3. Hold the pedal down for about 10-15 seconds.
4. Observe the pedal’s behavior during this time.
If the master cylinder is functioning correctly, the brake pedal should remain firm and maintain its position throughout the test. However, if you notice the pedal slowly sinking towards the floor, this could indicate an internal leak in the master cylinder.
A sinking pedal suggests that brake fluid is bypassing the seals within the master cylinder, causing a loss of hydraulic pressure. This issue can lead to reduced braking performance and potentially dangerous situations on the road.
It’s important to note that some vehicles may exhibit a slight, initial drop in pedal firmness due to the normal operation of the ABS system. However, this should stabilize quickly. If the pedal continues to sink or feels spongy, further investigation is necessary.
Repeat this test several times to ensure consistent results. If you consistently experience a sinking pedal, it’s advisable to have your master cylinder inspected by a professional mechanic.
Pressure Test
A more thorough assessment of your master cylinder’s performance involves conducting a pressure test. This test requires specialized equipment and is typically performed by professional mechanics. However, understanding the process can help you communicate more effectively with your mechanic and make informed decisions about your vehicle’s maintenance.
The pressure test involves connecting a brake pressure gauge to the brake system to measure the hydraulic pressure generated by the master cylinder. Here’s an overview of the process:
1. The mechanic will connect the pressure gauge to a brake bleeder valve, usually starting with the wheel furthest from the master cylinder.
2. With the engine off, the brake pedal is depressed to build pressure in the system.
3. The gauge reading is observed to ensure it reaches and maintains the manufacturer’s specified pressure.
4. The test is repeated for each wheel to check for consistent pressure throughout the system.
A properly functioning master cylinder should be able to generate and maintain the specified pressure. If the pressure drops rapidly or fails to reach the required level, it may indicate a problem with the master cylinder or other components of the braking system.
During the pressure test, the mechanic will also look for any signs of external leaks that become apparent under pressure. These leaks may not be visible during a standard visual inspection but can significantly impact braking performance.
It’s worth noting that some modern vehicles with advanced braking systems may require specialized diagnostic equipment to perform accurate pressure tests. Always consult with a qualified mechanic familiar with your vehicle’s specific braking system.
Brake Fluid Analysis
Analyzing the condition of your brake fluid can provide valuable insights into the health of your master cylinder and overall braking system. While a visual inspection can reveal obvious issues, a more detailed analysis can detect problems before they become severe.
Brake fluid testing typically involves checking two key factors:
1. Moisture content: Brake fluid is hygroscopic, meaning it absorbs moisture from the air over time. Excessive moisture in the brake fluid can lead to corrosion of internal components and reduced boiling point, potentially causing brake fade under heavy use.
2. Contamination levels: Particles from wear and tear of brake system components can contaminate the fluid, potentially causing damage to seals and valves within the master cylinder.
Professional mechanics use specialized tools to measure these factors accurately. A refractometer is commonly used to measure the moisture content of brake fluid, while a brake fluid tester can assess overall fluid quality.
Here are some general guidelines for brake fluid condition:
- Good: Clear to slightly yellow, no visible contaminants
- Fair: Light brown, may require replacement soon
- Poor: Dark brown or black, immediate replacement recommended
It’s important to note that brake fluid should be changed periodically according to your vehicle manufacturer’s recommendations, typically every 2-3 years. However, if testing reveals high moisture content or contamination levels, more frequent replacement may be necessary.
Regular brake fluid analysis can help prevent premature wear of your master cylinder and other brake components. It’s a proactive measure that can save you money on repairs in the long run and ensure your braking system remains in optimal condition.
Professional Inspection
While the tests described above can help you identify potential issues with your master cylinder, a professional inspection by a qualified mechanic is often necessary for a comprehensive assessment. Professional mechanics have the expertise, tools, and diagnostic equipment to thoroughly evaluate your braking system and pinpoint any problems accurately.
During a professional inspection, the mechanic will typically perform the following:
1. Visual inspection: A thorough examination of all brake components, including the master cylinder, brake lines, calipers, and rotors.
2. Brake system bleeding: Removing air from the brake lines to ensure proper hydraulic pressure.
3. Computerized diagnostics: For vehicles with advanced braking systems, such as ABS or stability control.
4. Road test: To assess real-world braking performance and feel.
5. Component measurement: Checking brake pad thickness, rotor condition, and other wear-prone parts.
A professional inspection can often reveal issues that may not be apparent through basic testing. For example, a mechanic might identify early signs of seal failure within the master cylinder before it leads to noticeable performance issues.
It’s recommended to have your braking system professionally inspected at least once a year or whenever you notice changes in braking performance. Regular inspections can help catch potential problems early, saving you money on repairs and ensuring your vehicle remains safe to drive.
Remember, while DIY testing can be helpful, it should not replace regular professional maintenance. Always prioritize safety when it comes to your vehicle’s braking system.
FAQs About How To Test Master Cylinder Brake
- How often should I test my master cylinder?
Test your master cylinder during regular brake maintenance, typically every 12,000 miles or annually. - Can I test the master cylinder without special tools?
Basic tests like visual inspection and pedal feel can be done without tools, but pressure testing requires specialized equipment. - What are the signs of a failing master cylinder?
Signs include a sinking brake pedal, fluid leaks, and inconsistent braking performance. - Is it safe to drive with a faulty master cylinder?
No, driving with a faulty master cylinder is extremely dangerous and can lead to complete brake failure. - Can I replace the master cylinder myself?
While possible, it’s recommended to have a professional replace the master cylinder to ensure proper installation and system bleeding.